When an operating system like JANOS is created it first reaches out to the world through the simplest communications channel, a serial port. When the developer then wants to interact with the new OS, commands are entered through that Command Line Interface. Soon a reasonable vocabulary of commands are made available for use and this becomes the developer’s Console.
As the operating system finds new ways to communicate with its surroundings it discovers the network and begins to support useful protocols. Logically the first would be some serial channel simulation (Telnet) over which it can offer access to its Command Line Interface for use by others. Eventually, graphical user interfaces emerge and a more modern and user-friendly environment comes into existence.
While the Command Line may seem Old School and it may generate some apprehension on the part of a new user, it is the Go-To utility for the developer. It is here that the system’s vitals can be monitored and the OS can be encouraged to perform for us. It is no surprise that the Command Line has been a key element of the JNIOR from the beginning. We will cover aspects of this user interface that have been enhanced with JANOS v2.0.
Persistent Command History
Every JNIOR, even back to the Series 3, memorized a few commands as you entered them during the Console session. It has always been possible to scroll back to a prior command using the cursor UPARROW and DNARROW keys. This allowed you to scroll to a command and re-execute it by hitting ENTER. You could even edit the command to create a new similar command and execute that. The Series 4 more than doubled the number of individual commands that it would remember during the session.
With JANOS v2.0 this command line history is now persistent. Meaning that you can exit the Console session, return at a later time and scroll back to commands that were entered in prior sessions. This persistent history is saved by User and so each user has his/her own. The same user can even access the Console simultaneously through different channels and retrieve past command history, not have confusion over commands entered in the other session, and see the logical combination of activities later. The number of commands remembered has been expanded to 99. This history, however, remains available ONLY as long as the JNIOR stays powered.
HISTORY Command
The HISTORY command has always been available and it displays those memorized commands. With Series 3 it was just a few and with Series 4 a longer list. But in those instances it otherwise had little utility.
With JANOS v2.0 the HISTORY command has been expanded to provide better access to the (now larger) record of commands.
bruce_dev /> help history
HISTORY [index|regex]

Options:
index Integer selects command for editing
regex Used for case-insensitive search

Accesses the command line history.
Aliases: HIST, HISTORY

bruce_dev />
For example, if you had entered a command earlier to reboot the JNIOR with some options that you now want to repeat, you can locate that command by typing hist boot. The HIST command being just a shortened alias for HISTORY. The “boot” text is used as a Regular Expression to search the history and any line matching the inquiry is listed. If there is only one matching line it will be selected and brought to the command line to be edited or executed. This command is now very useful.
When multiple lines are listed they are enumerated. You can select any command by entering its index. For example, hist 5 will retrieve the command line displayed with index 5 for editing and execution.
TAB Key
The <TAB> key has become useful in later versions of JANOS. It provides a means of auto-completion. For example, when entering a parameter to a command you can type the first couple of characters of a file or folder name and use the <TAB> key. JANOS will finish the entry with matching file of folder names. Repeated use of the <TAB> key scrolls through all possible matches and returns to your original line if none meets your need. If the name you seek is displayed you can merely continue to enter your command having been saved from explicitly typing the entire file or folder specification. Warning: You will become addicted to this aid. As much as you want it to, the Series 3 will not do it.
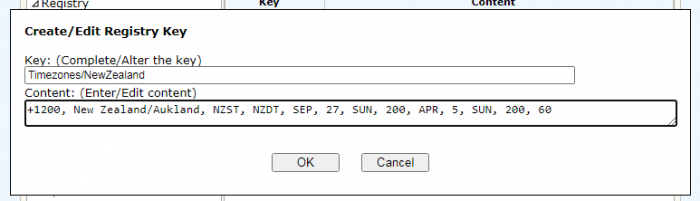
The <TAB> key in fact is context sensitive. If you are entering a REGISTRY command (REG for short) the auto-completion will use known or existing Registry keys instead of file or folder names. In addition, if you have entered the REG command, a Registry key and then the equals ‘=’ sign, if you immediately hit <TAB> (before any space) the current key’s value will be supplied. This is very useful, first if you cannot precisely remember a Registry key and then if you only want to modify the existing value slightly.
The context for auto-completion may be ambiguous in some places. JANOS may offer Registry keys when you in fact desire a Filename. As an alternative to the <TAB> key in those situations, if you need a file name you may use the Ctrl-F keystroke. Similarly, if you need a Registry key, you can use Ctrl-R.
At the beginning of a line you can enter the first character or two of a command and use <TAB>. This will auto-complete with valid commands and even offer matching commands from your command history. But, of course, some people do like to type.
Finally, imagine that you have just loaded an unruly named UPD file into the /temp folder and need to execute a manual update using the JRUPDATE command. The following generally builds the command for you without much thought:
jru<TAB> -fup t<TAB>/<TAB>
The above sequence could save you from typing something like this:
jrupdate -fup temp/janos-2.4.2.upd
This is best experienced through experimentation. Give it a try.
That command, by the way, would update the operating system and only the operating system on the JNIOR. The -U option schedules the update provided by the UPD file; The -F option (which can be specified as show or as a separate option and anywhere in the command) answers Yes to the confirmation prompt; And, the -P option Proceeds after ingesting the UPD file to perform the reboot and associated update.
More thorough updates are completed using the Support Tool and the appropriate Update Projects.