Security is a good thing. It is also hard. The IpConfig/Allow registry key will help you filter the connections permitted by the JNIOR.
The documentation for the use of the IpConfig/Allow key is as follows…
The IpConfig/Allow Registry key when present defines specific IP addresses and IP address subnets that are to be granted access to the JNIOR. All others are ignored. If undefined then all routable clients have access. For example, to restrict access only to your IP address (say 50.197.34.73) and your entire local subnet (10.0.0.x with mask 255.255.255.0) you would define the following:
reg IpConfig/Allow = “10.0.0.0/24, 50.197.34.73”
In this case you, using that specific address, and everyone on the local subnet would be able to see the JNIOR and access its functions while everyone else is blocked.
This therefore is a list of IP address/subnet specifications of the form:
nnn.nnn.nnn.nnn/dd
Here the 4 octet IP address for IPv4 is specified and ‘/dd’ if present indicates the number of bits from the left that must match. If the ‘/dd’ parameter is omitted it is the same as specifying ‘/32’ and as if you used a subnet mask of 255.255.255.255. In other words that IP address must match in its entirety.
Changes to this configuration setting take effect on reboot.
The IpConfig/Allow registry key can be powerful to help secure your JNIOR. It can successfully thwart unauthorized access and prevent DOS attacks.
The danger comes in when the registry key is mis-configured. It can be a typo or not fully configured, something simple, but when this happens it can prevent legitimate attempts to access the unit.
If this happens a USB-to-Serial cable is needed to access the unit via the RS-232 port. Make sure to use the correct serial settings of 115200, 8 data bits, 1 stop bit and no parity. Once connected you can issue the reg command.
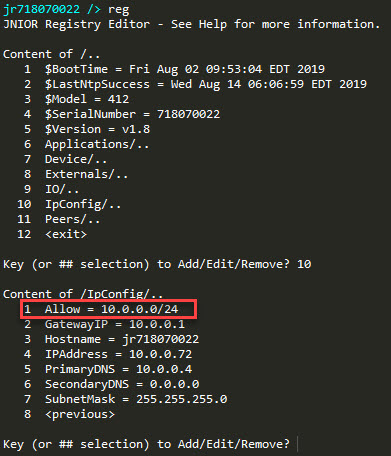
Above you can see that the IpConfig/Allow key is set for 10.0.0.0/24. This states that the first 24 bits of the address must match for a network connection to be accepted. If, for some reason, this was mistyped then legitimate connections would not be allowed. This would basically render the network port useless. The user might not have noticed what the error was.
Using the Serial to USB cable is the only way to access the unit. The key can then either be fixed or removed to regain access over the network.
Sometimes you need to find out what the IP Address of the JNIOR is that is sitting on your network. Sometimes someone else set it up and are no longer working with you or maybe you programmed it but years have passed and you haven’t needed to access the JNIOR because it is performing its job and no attention has been needed.
There are a couple of different ways to find out the IP Address.
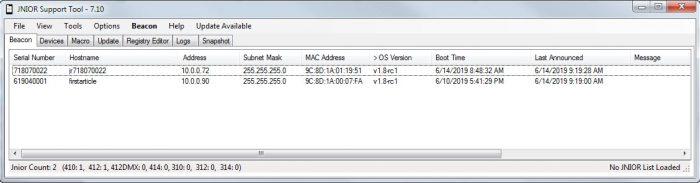
By far the easiest way to find the JNIOR IP Address is the use the JNIOR Support Tool. The JNIOR Support Tool only works on Windows systems. http://jnior.com/category/news/support-tool/ will have links to the latest, as well as previous, versions of the JNIOR Support Tool. Once loaded and started you will be presented with the Beacon tab. The Beacon tab will show all the JNIORs that are present on your LOCAL network that have reported. When the Support Tool launches a broadcast is sent out asking for all the JNIORs to report their information. Some network configurations can either help or hinder this operation. In most cases it works as intended. Here is a picture of the Beacon screen. If you have more than one JNIOR shown you can use the Serial Number of the JNIOR to identify which row corresponds to your unit or you can use the identify feature to pulsate the amber LED next to the power indicator. To perform that function you can right click on a row and select either Query | Identify or Configure | Identify from the menu.
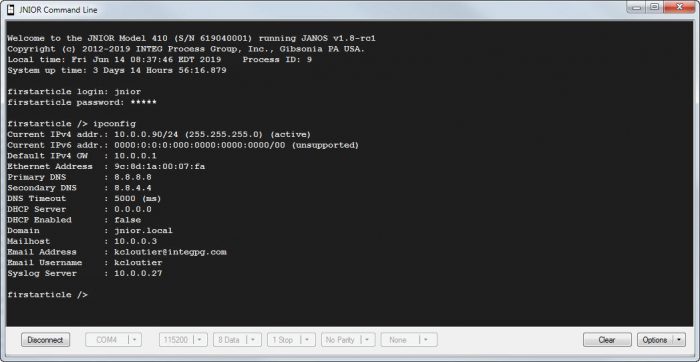
The other way to determine the IP Address of a unit is to directly connect a serial cable to the RS-232 port. Computers do not come with serial ports anymore so a USB to Serial adapter will be needed. You can find them at Amazon. Once the cable is connected, select your favorite terminal application or use the Command Line application included with the Support Tool. The serial settings must be 115200, 8, 1, none for the baud rate, data bits, stop bits and parity respectively. Now that the connection is set up you can press enter and the login prompt will be presented. The default credentials are username: jnior and password : jnior. You can now enter ipconfig to see the current network setup.
Lastly, for those who know Morse code, you can unplug the network cable and the status LED will flash Morse code representing the value of the last octet. You must know the first 3 octets of your network.
The JMP protocol shares the messaging JSON structure that is used by the DCP (Dynamic Configuration Page) and the web-socket protocol but on port 9220, by default.
To make processing easier we wrapped the JSON message in a two element JSON Array.
[ number, object ]
Where number is the size in bytes/characters of the JSON object that follows.
Doing this relieves us of needing to count braces to see when an entire JSON message was received. To parse the structure we can do the following:
Look for the opening ‘[‘.
Then process numeric values until a ‘,’ is found. White-space is ignored.
White-space is again ignored and N bytes are read.
Finally remaining white-space is ignored and the trailing ‘]’ confirmed.
If the numeric value is invalid, the comma missing or the trailing
‘]’ bracket not found, the entire message is to be ignored. The
extracted JSON Object can then be validated as well.
The key to debugging these days lies in the ability to recreate the failure. Some of the more elusive problems start out as rumors where a user swears that something failed to do what was expected but that he/she cannot prove it. After a while perhaps the issue resurfaces and this time someone is able to collect enough evidence to barely prove that the problem is a real concern. What exactly occurs remains a complete mystery. Eventually someone files a bug report but the developers are clueless and cannot effectively address the cause.
Sometimes there are suggestions as to what actions may have triggered the problem. The Support Team may take the time to try to recreate the problem on a local system but to no avail. Other issues which stand a better chance of being resolved take precedence. Meanwhile news comes in that the original issue has again occurred and may even now happen in completely different locations and environments. What to do next?
Perhaps it is appropriate to regenerate the application for the user’s site to add logging and other debugging statements in hopes of creating a better record of the events leading up to a future failure. The difficulty here is in deciding what exactly to log and to be logged by what aspects of the system given no real knowledge of the source of the issue. Some guesses are made and the logging is enabled. Some time later which could be weeks the issue reoccurs and the logging proves to have not been useful. It may even be that the content of the logs are now meaningless as the logic behind them has been forgotten. So it is difficult to make progress.
It would be nice to know when the issue is going to occur so you know exactly when you need to start watching for it. Better yet, if the problem occurs you could skip back in time to only a few seconds before and you could solve it! If the issue involves network interaction you could setup a sniffer like Wireshark and set it to collecting detailed network traffic. Now with an external device this may involve the use of a Network Hub as opposed to a Network Switch so you can add a machine running Wireshark that would see all of the traffic. But that is a lot of hardware and it might just not be feasible.
Here’s where JANOS and the JNIOR might surprise you. If the issue is with the JNIOR application you can use the netstat -c command from the Command Line interface to generate a PCAP capture file capturing network traffic. That PCAP file can be downloaded to a PC with Wireshark installed and it will open right up for analysis. And here’s where the magic occurs. It is almost like JANOS knows ahead of time when the issue will occur, that PCAP file can contain traffic from BEFORE the event happened although it has been generated after the fact.
Okay. So it is not magic but the foresight of the operating system which always is capturing network traffic. There is a capture buffer that by default is 512KB and that can be enlarged through the IpConfig/CaptureBuffer Registry Key to as much as 8MB. It is not so much a ‘buffer’ as it is a queue. At any one point in time it contains a significant amount of recent network traffic. You can also set filtering that is to be employed during capture to limit the collected traffic to that of concern and thereby greatly extend the time frames involved. You can also use a filter in generating the PCAP file to limit what you transfer for analysis.
Now what if the event occurs overnight and by the time you realize it the data that you need has been overwritten? A simple utility application can be added to the unit to automatically generate the network PCAP capture file when the event is detected. You can even then have that file emailed to you!
Those of you who may have worked with this aspect of the JNIOR will note that the network capture only includes data from the previous boot if it is not yet begun to wrap around. If the failure involves an assertion that might cause the JNIOR to reboot the information is lost. Well this is true, however, as of JANOS v1.7.1 which now as of this writing a Release Candidate the capture buffer is non-volatile. It will survive a reboot and contain a record of the prior network traffic. The buffer is only reinitialized when power is applied.
It is also possible to configure the JNIOR in Promiscuous Mode wherein it would capture all external network traffic and not only that targeted to the JNIOR. If you couple that with a Network Hub you could utilize the JNIOR to monitor the interaction of other devices on a local network segment. I bet you never thought of JNIOR as a IT debugging tool?
If this aspect of the JNIOR interests you or if you need to utilize it in debugging, please feel free to contact INTEG for support. You may also consult the Registry Key Assignments documentation for details on network capture. This information is supplied as part of the Dynamic Configuration Pages (DCP) served by the JNIOR WebServer accessible by your favorite browser.
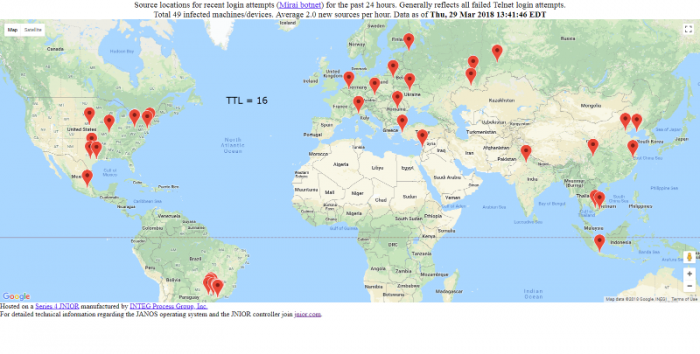
Beginning with JANOS v1.6.4 you will be able to adjust the Time-To-Live (TTL) parameter used by the network stack.
The IpConfig/TTL Registry key defines the lifespan of a network packet. The time-to-live value is a kind of upper bound on the time that an IP datagram can exist in the Internet system. The value is reduced with the passage through a router. If it reaches 0 the packet is discarded. The default value has been increased to 128 from the value of 64 used prior to JANOS v1.6.4.
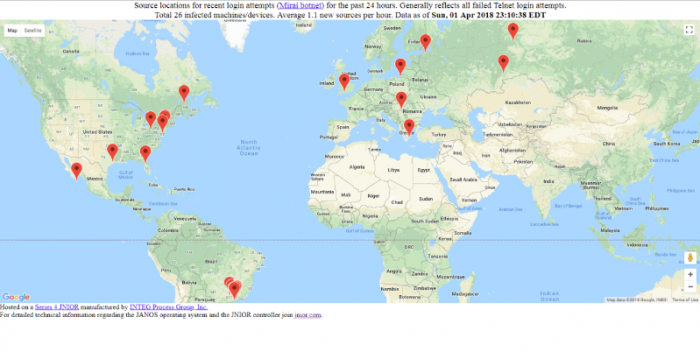
The TTL setting can be considered to limit the maximum radius (in terms of hops) of the network within reach of the JNIOR. The default setting should allow packets to reach the far end of the globe. A low setting would limit access to the unit as only those in the local vicinity could communicate. In this respect the TTL setting can be used to improve device security.
A very low setting of 1 or 2 would constrain the JNIOR to the local network. One must consider the need to reach Doman Name Servers (DNS) and Network Time Servers (NTP). There may also be the requirement for email transfers wherein the JNIOR needs to reach out to a SMTP Server. To help determine the minimum setting you may be able to use your PC’s TRACERT command to detect the hop count involved in reaching those destinations. The JNIOR does not support a route tracing function.
Real World Test
Luckily we have a neat way to test the effect of reducing TTL. We have a JNIOR we call HoneyPot sitting on the open Internet. Naturally it comes under a constant level of attack. For instance there is a fairly constant level of random login attempts on the Telnet port. On the JNIOR the Telnet port provides access to the JANOS command line interface. We log failed login attempts to a @/access.log@ file.
Log files on the JNIOR rollover to BAK files when they reach 64 KB in size. We keep only one BAK file for each log. Typically an application would archive BAK files when longer term logging is desired. A syslog server can be used for the system log @/jniorsys.log@ for longer term logging.
On HoneyPot we have an application that takes the access.log when it rolls over and analyzes the hosts attempting to log into the unit. IP addresses are added to a database (JSON based) covering data from the past 24 hours. The application uses a locating service to identify the geographical location of the host. A simple web page http://honeypot.integpg.com/map.php receives the database and uses the Google Maps API to plot these locations.
By default JANOS uses a TTL of 128. The map typically appears as follows:
If we reduce the TTL to 16 the map changes. Note that this seems to thin out the number of hosts able to communication with the unit. It does not seem to create a geographical radius.
The thinning effect is useful but one gets the feeling that systems within our own country may no longer be able to communicate with the unit.
The further reduction of TTL to 12 begins to suggest a geographical radius. Note in the following how the unit now seems to be invisible in China. This might suggest that our friends in far away places might actually be using shortcuts in the network to gain access to systems in the United States.
Of course, for a controller the most important aspect of this kind of security is whether or not YOU can access your own unit. In that case you might also use the IP filtering functionality of the device and limit access to only YOU.
One note. With the TTL limited to 16 the HoneyPot unit had trouble reaching some of the @pool.ntp.org@ NTP servers for synchronizing the clock. By limiting the radius of the network you may limit the useful services such as DNS and NTP.
So this test fails in that the service that is used to determine a location for an IP address is about 12 hops away. Here we see it is 13 from inside INTEG.
Microsoft Windows [Version 6.1.7601]
Copyright (c) 2009 Microsoft Corporation. All rights reserved.
C:\Windows\system32>tracert ip-api.com
Tracing route to ip-api.com [69.195.146.130]
over a maximum of 30 hops:

1 <1 ms <1 ms <1 ms 10.0.0.1
2 1 ms 1 ms 1 ms 50-197-34-78-static.hfc.comcastbusiness.net [50.197.34.78]
3 12 ms 9 ms 9 ms 96.120.62.245
4 10 ms 9 ms 8 ms te-0-1-1-1-sur01.westdeer.pa.pitt.comcast.net [68.86.146.225]
5 32 ms 15 ms 15 ms be-62-ar01.mckeesport.pa.pitt.comcast.net [69.139.195.37]
6 28 ms 21 ms 37 ms be-7016-cr02.ashburn.va.ibone.comcast.net [68.86.91.25]
7 21 ms 20 ms 20 ms be-10130-pe04.ashburn.va.ibone.comcast.net [68.86.82.214]
8 20 ms 20 ms 19 ms 23.30.206.206
9 61 ms 61 ms 72 ms xe-0-2-1.cr2-kan1.ip4.gtt.net [213.254.215.121]
10 62 ms 52 ms 51 ms ip4.gtt.net [69.174.12.26]
11 52 ms 53 ms 60 ms 10.0.1.137
12 * * * Request timed out.
13 52 ms 51 ms 51 ms us-mo-1.free.ip-api.com [69.195.146.130]

Trace complete.
C:\Windows\system32>
And as a result with TTL restricted to 10 I get a lot of these errors.
04/05/18 08:29:12.949
** Uncaught java/io/IOException thrown: "Unable to connect to remote host"
  in java/io/IOException.<init>:(Ljava/lang/String;)V
  in java/net/PlainSocketImpl.connect:(Ljava/net/InetAddress;I)V
  in java/net/Socket.<init>:(Ljava/net/InetAddress;ILjava/net/InetAddress;IZ)V
  in java/net/Socket.<init>:(Ljava/lang/String;I)V
  in jaccess/JAccess.main:([Ljava/lang/String;)V at line 71
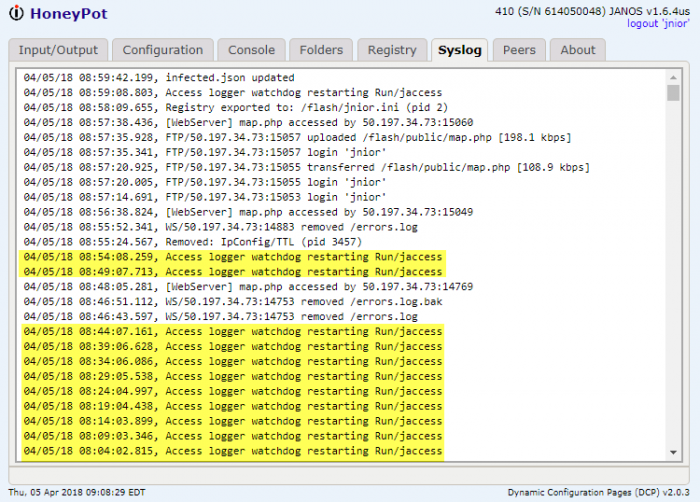
Just a note that I generally create application programs that are not destined for customer deployment with a throws Throwable clause. This insures that every exception is logged to the errors.log file and I don’t need to busy the code with try-catch structures. The application uses the com.integpg.system.Watchdog class which restarts the application after a timeout. You can see this in the system log up until I removed the TTL restriction.
In summary…
Reducing the TTL reduces the “radius” of the the accessible Internet but that does not precisely correspond to a geographic radius. Sites in Russia appear to have access to our Internet vicinity through less hops than some citizens in this country. Still it is a good defense in limiting access to the JNIOR so long as the resources your application uses can still be reached.
I had been thinking about this.
In testing by running with a low TTL we ran into problems where the JNIOR had difficulty reaching services it requires (like NTP) while locations perhaps even in Russia could still reach us. It seems to me that the standard large TTL should still be used for all outgoing communications. But a reduced TTL applied only to incoming connections. Specifically to UDP replies and TCP/IP SYN ACK responses. This would prevent distant (Internet radius wise) hosts from initiating connections or soliciting UDP replies.
The issue with UDP is that the original source TTL is unknown. So we cannot filter on it. The UDP would be received and would be processed. That packet would represent a vulnerability. All we can do is prevent any response from making it back to the malicious host.
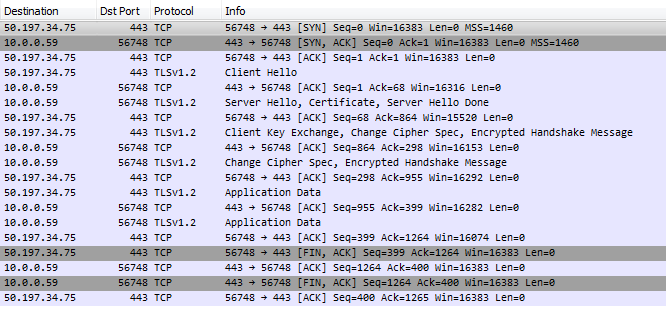
We showed you how to make an Outgoing HTTP Request. If you would like to make a secure connection you need only add a single line of code.
dataSocket.setSecure(true);
Here I will securely connect from my development JNIOR to the external HoneyPot JNIOR. From the example in the other topic I have modified the host and the request to attempt to access the JNIOR.
package jtest;

import com.integpg.system.Debug;
import java.io.DataInputStream;
import java.io.DataOutputStream;
import java.net.Socket;

public class Main {

    public static void main(String[] args) throws Exception {

        // Location services
        String serverHostname = "50.197.34.75";
        int port = 443;

        // Establish a Socket, get streams, and set a timeout
        Socket dataSocket = new Socket(serverHostname, port);
        DataOutputStream sockout = new DataOutputStream(dataSocket.getOutputStream());
        DataInputStream sockin = new DataInputStream(dataSocket.getInputStream());
        dataSocket.setSoTimeout(5000);

        // Negotiate a secure connection
        dataSocket.setSecure(true);

        // Issue the HTTP request
        sockout.writeBytes("GET / HTTP/1.1\r\n");
        sockout.writeBytes("Host: " + serverHostname + "\r\n");
        sockout.writeBytes("\r\n");

        // Process the response header
        int length = 0;
        String response;
        while ((response = sockin.readLine()) != null) {

            // Header ends with blank line
            if (response.length() == 0)
                    break;

            System.out.println(response);
            if (response.startsWith("Content-Length: "))
                length = Integer.parseInt(response.substring(16));
        }
        System.out.println();

        // Obtain the entire response (if any)
        response = "";
        if (length > 2) {
            byte[] resp = new byte[length];
            sockin.readFully(resp);
            response = new String(resp, "UTF8");
        }

        // Data (should be JSON)
        Debug.dump(response.getBytes());

        // Close the Socket
        sockout.close();
        sockin.close();
        dataSocket.close();
    }

}
The JNIOR captures network traffic continuously. A large queue is established at boot and a record of network packets is kept. Once the queue fills the oldest packets are dropped. Depending on your network usage that queue might contain the past hour of traffic or much more.
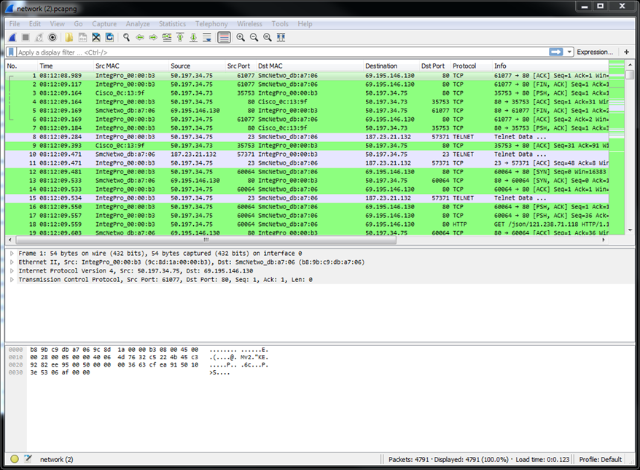
The NETSTAT -C command generates a network capture file /temp/network.pcapng on demand containing the content of the capture queue. For example:
HoneyPot /> netstat -c
LAN connection active (100 Mbps)
 generating capture file...
 /temp/network.pcapng created
 collected 4791 packets from the previous 16 minutes
HoneyPot />
You can download this file to your personal computer. If you have Wireshark installed you will likely be able to double-click this PCAPNG file and it will open right up for viewing and analysis.
Notice that in my example only the past 16 minutes were captured. First of all the capture begins at boot. So if your JNIOR has only been up for 16 minutes that is all that you will get. This, I think, was the case here.
It is important also to note that when you access the DCP you are also using the network. That means that all of the packets involved with your browser access will also be captured. If you leave the DCP up to monitor the status of your JNIOR all of that traffic takes up space in the capture buffer. If you are interested in analyzing the JNIOR interaction with another device that DCP traffic will limit the amount of information you can capture relative to that other device.
One solution is to not use the network to monitor the JNIOR by using the RS-232 (COM) port. But for that you have to be physically at the JNIOR and have the ability to use a serial connection. A better solution is to use capture filtering.
With the JNIOR you can both filter the packets that are to be retained in the capture buffer and filter the packets that you extract into the /temp/network.pcapng file. For example I will set this JNIOR up to ignore HTTP (Port 80) traffic and capture everything else. I can then use the DCP without loading the capture buffer with packets that we are not interested in.
HoneyPot /> netstat -f !80
LAN connection active (100 Mbps)
 capture filter set
HoneyPot />
This tells JANOS to only accept packets into the capture buffer that DO NOT reference port 80. This takes effect immediately (provided there isn’t a syntax error). The next /temp/network.pcapng file that I generate will no longer contain HTTP communications and therefore nothing to do with the DCP. There will be many more packets from a longer period of time all pertaining to other communications that might help with my debugging.
The NETSTAT -F command basically sets the IpConfig/CaptureFilter Registry key. If you mouseover that key in the Registry tab of the DCP and hit F1 you will see the documentation for filtering and the syntax for these filters. These details are in the Registry Key Assignmentsdocumentation. The current version of that documented is distributed as part of the DCP. It will be present on every Series 4 JNIOR that is up to date.
Network Filtering
The content of a network capture or the network clients allowed to interact with the JNIOR can be controlled through dynamic filtering. These filters can be quite simple or, if needed, much more sophisticated.
The IpConfig/CaptureFilter Registry key may optionally define a filter which is applied to incoming packet data prior to capture. There is limited storage for captured information and by filtering you can extend the capture period and the amount of pertinent information collected.
A filter may also be used in generating the network.pcap capture file from the capture buffer. Here the filter allows you to extract only pertinent information and otherwise keep file sizes at a manageable level.
The IpConfig/Allow Registry key may optionally define a filter which is applied to incoming connections. In this case the referenced IP addresses refer to the incoming source IP addresses, those of clients. Referenced port numbers refer only to destination ports, those available on the JNIOR.
IP Address Filters
To filter packets referencing a specific IP address you need only include the IP address in the format “nnn.nnn.nnn.nnn” in the filter string. Any packet that references this IP address either as the source or the destination address will be selected for inclusion. All other packets will be excluded unless covered by some other part of the filter.
To exclude packets referencing a certain IP address you can prefix a ‘!’ exclamation point to the address like this “!nnn.nnn.nnn.nnn”. All packets that do reference the IP address as either a source or destination address will NOT be selected for inclusion. This can also be written as “NOT nnn.nnn.nnn.nnn”.
Note that an IP address is identified by its format, four decimal values between 0 and 255 separated by the ‘.’ period.
The domain syntax allows a range of IP addresses associated with a netmask to be specified. The format is “nnn.nnn.nnn.nnn/mm” where ‘mm’ specifies the number of high order bits in the netmask. For example, “10.0.0.0/24” specifies any IP address in the domain that contains IP addresses 10.0.0.1 through 10.0.0.255 and uses a netmask of “255.255.255.0”. This would be useful in selecting only local traffic for instance.
MAC Address Filters
Although less often required you can filter on a specific MAC address. The MAC address is included in the filter string in the format “hh:hh:hh:hh:hh:hh”. The format is six hexadecimal values (0-9a-f or 0-9A-F) separated by the ‘:’ colon. For instance most INTEG Series 4 JNIORs have MAC address formatted as “9C:8D:1A:hh:hh:hh” where the lower three bytes are assigned in some sequence.
As with IP addressing, packets with MAC addresses may be excluded by writing the filter as “!hh:hh:hh:hh:hh:hh” or “NOT hh:hh:hh:hh:hh:hh”. Again a MAC address is identified by its format.
TCP/UDP Port Filters
A port is specified in the filter string as a decimal value between 1 and 65535 inclusive. No punctuation is used. The capture filter does not distinguish between a TCP or UDP port number. A port may be excluded using the negation “!nnn” or “NOT nnn”.
There are standard ports assigned for various functions. The capture filter knows some of them by name. Some may be reconfigured through the Registry. As a convenience the port may be specified using its protocol name. The capture will be filtered on the port as configured at the time the filter is compiled (at boot or upon NETSTAT command). JANOS recognizes these port names where the default values are shown in parentheses: SMTP (25), NTP (123), JNIOR (9200), FTP (21), HTTP (80), HTTPS (443), TELNET (23), and BEACON (4444). These ports may be excluded using the same negation syntax as previously shown
Boolean Constants
The capture filter will also recognize the terms TRUE and FALSE. True indicates that the packet is to be included and False otherwise.
Logical Operations
To filter on a single IP address, MAC address or port (or to exclude a single item) the filter need only specify the address or port in the associated format. The following would select the communications involved in an email transfer. If this is used as an incoming filter, only email transactions would be captured. If this is used with NETSTAT –C in generating the PCAPNG file, the file would only include email communications.
            NETSTAT –C SMTP
            netstat –c 25
Note that filters (and also commands) are not case-sensitive. Either form above will create a PCAPNG file with just email communications. This assumes that you have not reconfigured the SMTP port. If you have set Email/Port to another port (587 for instance) then the first line will extract your email communications and the second will not. Although the second filter might show an application trying to use the incorrect port.
Filters often need to be slightly more complex in order to include the collection of communications needed. The syntax allows you to specify any number of addresses or ports in any combination using AND, OR and XOR logic. As an alternative you may use the notation ‘&&” and ‘||’ for AND or OR respectively.
As an example perhaps you want to filter only email communications with the SERVER.
netstat –c 10.0.0.4 && smtp
If you want to also include BEACON communications you might write the filter as:
netstat –c 10.0.0.4 AND smtp OR beacon
But here you might question the order of precedence of the logical operations. The capture filters do not support an order of precedence but perform the operations from left to right. So this would be calculated as follows:
netstat –c (10.0.0.4 && SMTP) || BEACON
And this would have done what we had said. If there is some question you can use the parentheses in the filter as shown. The following will create the same subset of packets but would not if we were to exclude the parentheses:
netstat –c BEACON || (10.0.0.4 && SMTP)
A parentheses grouping can be negated as you would expect. The following will create a capture of all activity EXCEPT email communications with the SERVER.
netstat –c !(10.0.0.4 && smtp)
Finally if we had wanted to mask these email communications from the overall capture buffer we can install this filter using the command:
netstat –f !(10.0.0.4 && smtp)
This would result in the following Registry setting and would filter out matching communications until such time as the filter is removed.
IpConfig/CaptureFilter = !(10.0.0.4 && smtp)
The JNIOR will only capture packets that are addressed to it. That would include broadcasts.
Ok. Well perhaps it is undocumented (and you didn’t hear it from me) but you can set the IpConfig/Promiscuous Registry Key to true. The JNIOR then will capture (subject to any filtering) all traffic including packets not addressed to the JNIOR. But for this to be of any use you will need to be using a Network Hub instead of a Network Switch. There is a difference. The latter “switch” will only pass packets to the JNIOR that are addressed to it in addition to any broadcasts. If you are interested in other traffic you need to use the “hub” which passes all traffic to all connected devices.
The Series 4 JNIOR with a hub then can be a valuable network debugging tool useful in sniffing traffic between two other devices (connected via hubs). It would allow you to remotely use the features of Wireshark.